Xamarin.Forms & PaintCode
Last week, PaintCode 3 was 20% off. And that gave me an idea for a post. In this post, I'll explain how to create a custom control using PaintCode and Xamarin.Forms' custom renderers, starting from the drawing itself, this post may be a little bit too long but I'm sure it is worth it.
PaintCode drawing
If you have previously created and exported graphics using PaintCode, you probably want to skip this section. But if you haven't you must start by adding a new canvas, in this case I'll name it SharpCanvas and its dimensions are 100 by 100, or a 1:1 ratio, which is the same as the drawing I'll be creating:

Then, add a Frame, I'll be calling it SharpFrame:

On the left panel, we need to add a color called FillColor, and have it set as a Parameter:

Now lets add a couple of variables: Width y Height and make their values the same as our frame size, add them also as Parameters:

Then, with the frame selected, we're going to drag from the variable panel up to the frame's properties. So that the Frame's Width is bound to the Width value from the variables panel, then do the same for Height:

And now we're ready to create our drawing:

Our next task is to link the color we created before (FillColor) with the fill color of our recently created drawing. If you made it right, the color of our drawing will change to the one we set before:

Pay attention to this next step as it is very important if we want our drawing to adjust whenever the frame changes its size. If the drawing you made is a bézier curve (as it is in this case), double click it until some dots appear its path:

Once they show up, select them all and on the right panel, just below the Transforms menu click on the small "I" on the square, so that the four lines that join the central dot with the square become zigzagging lines:


By this point you'll be able to verify that everything is working properly if you change the values of the variables Height y Width on the left panel.
Before we're done for a minute with PaintCode, select the tab at the top that has "StyleKit" as its name, and then on the right panel modify the properties so they somewhat match your project:

Xamarin.Forms code
First thing we're going to do with the code, is create a class that will be the reference for our control. In this case, I called it SharpView but no matter what name you chose, it must inherit from View:
public class SharpView : View
{
}
To it you need to add all the properties you wish, in this case we'll be adding just one (FillColor) as it'll be a reference to the fill color of our drawing.
    public static readonly BindableProperty FillColorProperty =
        BindableProperty.Create(nameof(FillColor), typeof(Color), typeof(SharpView), default(Color));

    public Color FillColor
    {
        get { return (Color)GetValue(FillColorProperty); }
        set { SetValue(FillColorProperty, value); }
    }
Lastly, we must set a few default properties, these will improve our control appearance and they can always be overridden if we want to:
    public SharpView()
    {
        BackgroundColor = Color.Transparent;
        HorizontalOptions = LayoutOptions.Center;
    }
And we're don with the Forms project.
Xamarin.iOS code
In the iOS project, we'll be creating two new classes: the "native" control and a custom renderer:
Native control
Lets start with the native control. Create a new class that inherits from UIView, we're going to call it UISharpView:
public class UISharpView : UIView
{
}
We need to add at least one constructor that takes a CGRect as an argument, this argument will be passed on to the base class and our control will take its size from it:
    public UISharpView(CGRect rect)
        : base(rect) { }
We must add a property that corresponds to the FillColor property in our Forms control, the name can be different, but to keep some consistency, lets name it FillColor too. If you see, inside this property there is a call to the SetNeedsDisplay method, it will force the control to be redrawn every time the property's value changes:
    UIColor _fillColor = UIColor.FromRGB(60, 138, 63);

    public UIColor FillColor
    {
        get { return _fillColor; }
        set { _fillColor = value; SetNeedsDisplay(); }
    }
Now, lets go back to PaintCode for a second, we need to retrieve the drawing's code. In the export panel make sure that "iOS > C# Xamarin" is selected:
<img src="https://thatcsharpguy.github.io/postimages/xamarin-forms/paintcode/12codeSelection.png" title=Selección de código C# Xamarin />
Once selected, copy all lines of code to this newly created class. You may need to add a couple of using sentences for it to compile. To finish, override the OnDraw method, in it call the method you've just copied from PaintCode (in this case it is called DrawSharpCanvas), and pass the fill color and the frame dimensions to it as parameters:
    public override void Draw(CGRect rect)
    {
        DrawSharpCanvas(FillColor, rect.Width, rect.Height);
    }
Custom renderer
Now it's the time to implement the custom renderer. First off, lets create a new class that inherits from ViewRenderer<TAbstraction, TNative>, I'll be calling it SharpViewRenderer and it'll have the Forms class as TAbstraction and UISharpView as TNative. Don't forget the ExportRenderer attribute:
[assembly: ExportRenderer(typeof(SharpView), typeof(SharpViewRenderer))]
namespace SharpPaintCode.iOS.Controls
{
    public class SharpViewRenderer : ViewRenderer<SharpView, UISharpView>
    {
Inside it, lets create an instance of UISharpView and set it as the element that is to be shown on screen, this is done by overriding the OnElementChanged method. We'll take the size from the WidthRequest and HeightRequest Elements properties. For the fill color, we'll also use the FillColor:
    protected override void OnElementChanged(ElementChangedEventArgs<SharpView> e)
    {
        base.OnElementChanged(e);

        if (e.NewElement != null)
        {
            if (Control == null)
            {
                var sharpFrame = new CGRect(0, 0, Element.WidthRequest, Element.HeightRequest);
                var native = new UISharpView(sharpFrame);
                native.FillColor = Element.FillColor.ToUIColor();
                SetNativeControl(native);
            }
        }
    }
Finally, we need to add a way to modify the FillColor of the native control when we modify it from the Forms project. To do that, inside the renderer we must override the OnElementPropertyChanged and inside it we we'll change the native fill color property:
    protected override void OnElementPropertyChanged(object sender, PropertyChangedEventArgs e)
    {
        if(e.PropertyName.Equals(nameof(SharpView.FillColor)))
            Control.FillColor = Element.FillColor.ToUIColor();
        else
            base.OnElementPropertyChanged(sender, e);
    }
And that's all about the iOS project.
Xamarin.Android code
Similarly, in this project we'll have to create a "native" view and a *renderer. We're going to start with the native control:
Native control
In Android we'll create our native control class, following the good practices of the Android platform, we'll call it SharpView, in this case it has to inherit from View, just make sure it inherits from Android.Views.View and not from Xamarin.Forms.View:
public class SharpView : View
{
}
This class must have at least one constructor that takes a Context instance, this instance will be passed on to the base class:
    public SharpView(Context context) : base(context)
    {
    }
Now, in this case we need to add a new property, FillColor so that we can set the drawing's fill color, you should note that inside this property the method Invalidate gets called, this method will force our control to be redrawn:
    public Color _fillColor = Color.Argb(255, 60, 138, 63);
    public Color FillColor
    {
        get { return _fillColor; }
        set
        {
            _fillColor = value;
            Invalidate();
        }
    }
Now, again, pay attention to this following step: PaintCode doesn't support Xamarin.Android yet, but for us it makes no difference as Java and Xamarin's C# are similar enough to translate it ourselves. To star, open again PaintCode and make sure "Android > Java" is selected in the export code panel:
<img src="https://thatcsharpguy.github.io/postimages/xamarin-forms/paintcode/13androidJava.png" title=Selección de código C# Xamarin />
Now, inside the Android project, create a new class called SharpKit, wipe all the boilerplate code and paste in it the code from PaintCode, there should be a ton of errors, but don't worry, all you have to do is remove the package declaration, erase all the import lines and, if you feel like, put the remaining clas into a C# namespace.
Then, add the following using statements at the top of the file:
using System;
using Android.Graphics;
The following step is to convert all the Java methods to C#. In Java it is normal for methods and properties to start with a lowercase letter, so, for most of the code it should be enough to make all the methods and properties start with an uppercase letter to save you some time, search and replace the following strings: .save( for .Save(, .set( for .Set(, .reset( for .Reset(, .moveTo( for .MoveTo(, .cubicTo( for .CubicTo(, .width( for .Width(, .height( for .Height(, .top for .Top, .left for .Left.
There are some difficult translations, most of them related to enum datatypes. But don't worry, take into consideration the following table:
paint.setFlags(Paint.ANTI_ALIAS_FLAG);      →   paint.Flags = PaintFlags.AntiAlias;
paint.setStyle(Paint.Style.FILL);           →   paint.SetStyle(Paint.Style.Fill);
paint.setColor(fillColor);                  →   paint.Color = new Color(fillColor);
canvas.drawPath(sharpSymbolPath, paint);    →   canvas.DrawPath(sharpSymbolPath, paint);
Once the code compiles again, inside the native control, we need to override the OnDraw method to set it to use the DrawSharpCanvas we added inside the SharpKit class, pass the color and dimensions of your control to it:
    protected override void OnDraw(Canvas canvas)
    {
        SharpKit.DrawSharpCanvas(canvas, _fillColor.ToArgb(), Width, Height);
    }
Now, lets add the custom renderer.
Custom renderer
Again, inside the Android project we need to add a new class that inherits from ViewRenderer<TAbstraction, TNative>, lets get creative and name it SharpViewRenderer, it'll have SharpView (from the central project) as TAbstraction and SharpView (from the Android project) as TNative, for this singular case, we'll use aliases to not confuse the controls:
using FormsSharpView = SharpPaintCode.Controls.SharpView;
using NativeSharpView = SharpPaintCode.Droid.Controls.Native.SharpView;

[assembly: ExportRenderer(typeof(FormsSharpView), typeof(SharpViewRenderer))]
namespace SharpPaintCode.Droid.Controls
{
    public class SharpViewRenderer : ViewRenderer<FormsSharpView, NativeSharpView>
    {
The next step is to create an instance of NativeSharpView and set it as the on-screen control for our custom control. For it to happen, override the OnElementChanged and create such instance, pass to it the Context property and set the FillColor from the beginning:
    protected override void OnElementChanged(ElementChangedEventArgs<FormsSharpView> e)
    {
        base.OnElementChanged(e);

        if (e.NewElement != null)
        {
            if (Control == null)
            {
                var native = new NativeSharpView(Context);
                native.FillColor = Element.FillColor.ToAndroid();
                SetNativeControl(native);
            }
        }
    }
We need also a way to modify the native's FillColor from our Forms control, and to do it, override the OnElementPropertyChanged, inside it, change the property if the property being changed is called FillColor:
    protected override void OnElementPropertyChanged(object sender, PropertyChangedEventArgs e)
    {
        if (e.PropertyName.Equals(nameof(FormsSharpView.FillColor)))
        {
            Control.FillColor = Element.FillColor.ToAndroid();
        }
        else
        {
            base.OnElementPropertyChanged(sender, e);
        }
    }
And, that's it for our custom control.
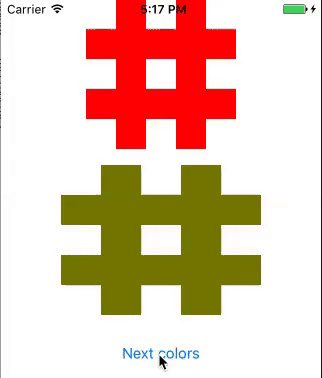
Demo
Remember: you can download a full version of this project in GitHub so you can play and learn with it.
In order to test the control, I created a simple app that lets you change the color of two SharpViews, it looks like this while running on iOS (it looks the same in Android):
And with a little more imagination and patience, you can make even more interactive controls: